Today I want to describe how to set up the Headphones plugin in my Freenas-box. I’m still running Freenas 9.2.1 on a HP ProLiant G7 MicroServer N54L (affiliate link).
I already set up Freenas with Transmission, Couchpotato, Sickbeard and a DLNA-Server. It downloads and stream movies and streams it to my TV. I’m using this setup now for quite a while. I also had Headphones already running, but it wasn’t installed as a plugin. It also used the original Musicbrainz-server to collect metadata about my music-collection, but this server is always overloaded. That’s why I decided to use the headphones-plugin provided by Freenas and to set up a local Musicbrainz-mirror that Headphones queries for metadata that will not be constantly overloaded.
Table of contents
Prerequisites
I assume that you are familar with how Freenas works, its frontend and maybe the command line. If you never used Freenas before, consult the documentation and my post. There you’ll find all the information about installing Freenas and its plugins.
Headphones and Musicbrainz make use of two storages: downloads and music. Headphones searches for downloaded music on the downloads-storage. Then it processes the found music and stores it in the music-storage. If you don’t have these storages, create them now. Refer to the chapters overview of storages and jails and creating storage devices in my other blog post.
You also have to install the Transmission-plugin. Again refer to my other blog post. Don’t forget to add the downloads and music storage to it!
If you want to use the Usenet instead of Torrents, look at this blog-post to see how to integrate it into Headphones!
Furthermore you will have to access Freenas and the jails via command-line, so be sure to know how to do it!
Only continue if you completed all the above steps!
Musicbrainz
This tutorial is outdated, please use the official documentation here!
Musicbrainz is not available as a Freenas-plugin (though there are efforts to port it). There are two ways to install a Musicbrainz-server: Do it from scratch or use the pre-configured virtual image (“ova”) provided by Musicbrainz. I am going to use the prebuild-image. It’s vastly easier to install, because Freenas offers a jail that provides a PHP-frontend to Virtualbox. This way you can run Virtualboxes headless.
If you do not want to host your own Musicbrainz-server, just skip right to the Headphones-section.
Installation
First, download the “MusicBrainz Server Virtual Machine (Virtual Box)” here. Do not download the ova-file to your computer! Instead download the torrent with the Transmission-plugin to your Freenas. It should be in the /mnt/media/downloads-directory.
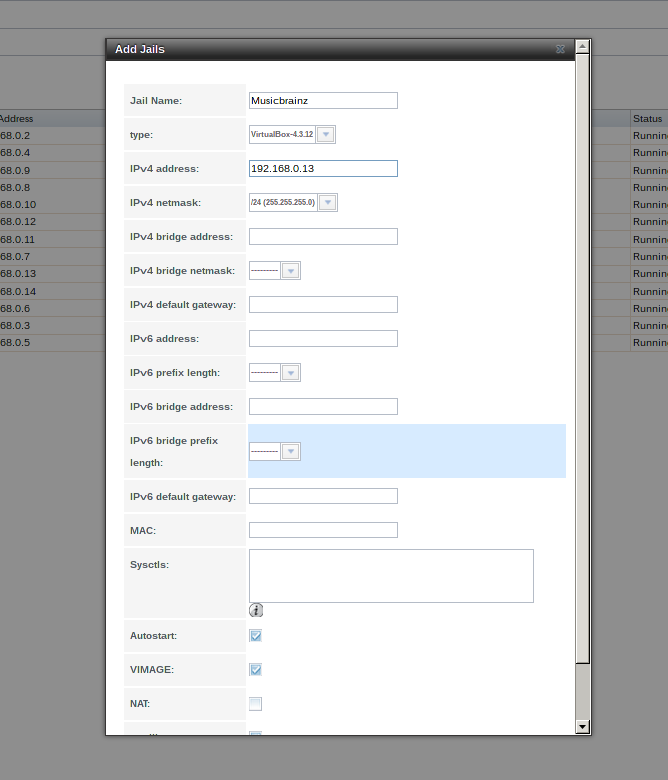
This is going to take some time so we might as well go on with the installation process. Open up the Freenas-frontend and create a new jail. Give it an appropriate name (Musicbrainz in my case) and be sure to use “Virtualbox” as the type:
This is going to take some time, too, so grab a cup of coffee. After the installation is complete, you’ll have to add the downloads-storage to the Musicbrainz-jail. The correct paths for the source and destinations are described in the storage-paths-section. Again, if you don’t know how to do this, refer to the documentation in my other post.
There’s a bug in Freenas 9.2.1. It prevents directories from being created when creating a jail and ticking the “Create directory”-box. This bug results in the following error-message:
Sep 15 01:09:29 freenas manage.py: [middleware.exceptions:38] [MiddlewareError: The path could not be mounted /mnt/media/downloads: Mount failed (64) -> mount: /mnt/media/jails/headphones_1/media/downloads: No such file or directory ]
If you encounter this bug, you have to create the directories as described here. Additionally I created an Asciinema-video that shows how to do it:
And here again on codeform:
basti ~ $  : "connect to your freenas-box"
basti ~ $  ssh 192.168.0.105 -lroot

[root@freenas] ~# : "find the right jail"
[root@freenas] ~# jls
JID  IP Address      Hostname                      Path
18  -               Musicbrainz                   /mnt/media/jails/Musicbrainz

[root@freenas] ~# : "connect to the musicbrainz jail"
[root@freenas] ~# jexec 18 tcsh
root@Musicbrainz:/ # : "create the downloads-directory"
root@Musicbrainz:/ # mkdir /media/downloads
root@Musicbrainz:/ # : "done"
After that, you have to mount the storages in the Freenas-frontend again to make them available to the jail.
Hopefully the ova-file finished downloading by now, because you’ll need it now. Open the IP-address of the jail in your browser. You’re greeted with a login-box. Type admin as username and password. You should now see the Virtualbox-Frontend.
In the upper left corner, click File then Import appliance. In the appearing popup, insert the path of the ova-file you downloaded. In my case its /media/downloads/musicbrainz-server-2014-05-14.ova. Then click next, than import. Again, this will take some time. After it finished importing, start the VM. Then right-click on the VM, select Settings. Then click “Display” and tick the “Enable Server”-box, and insert a password.
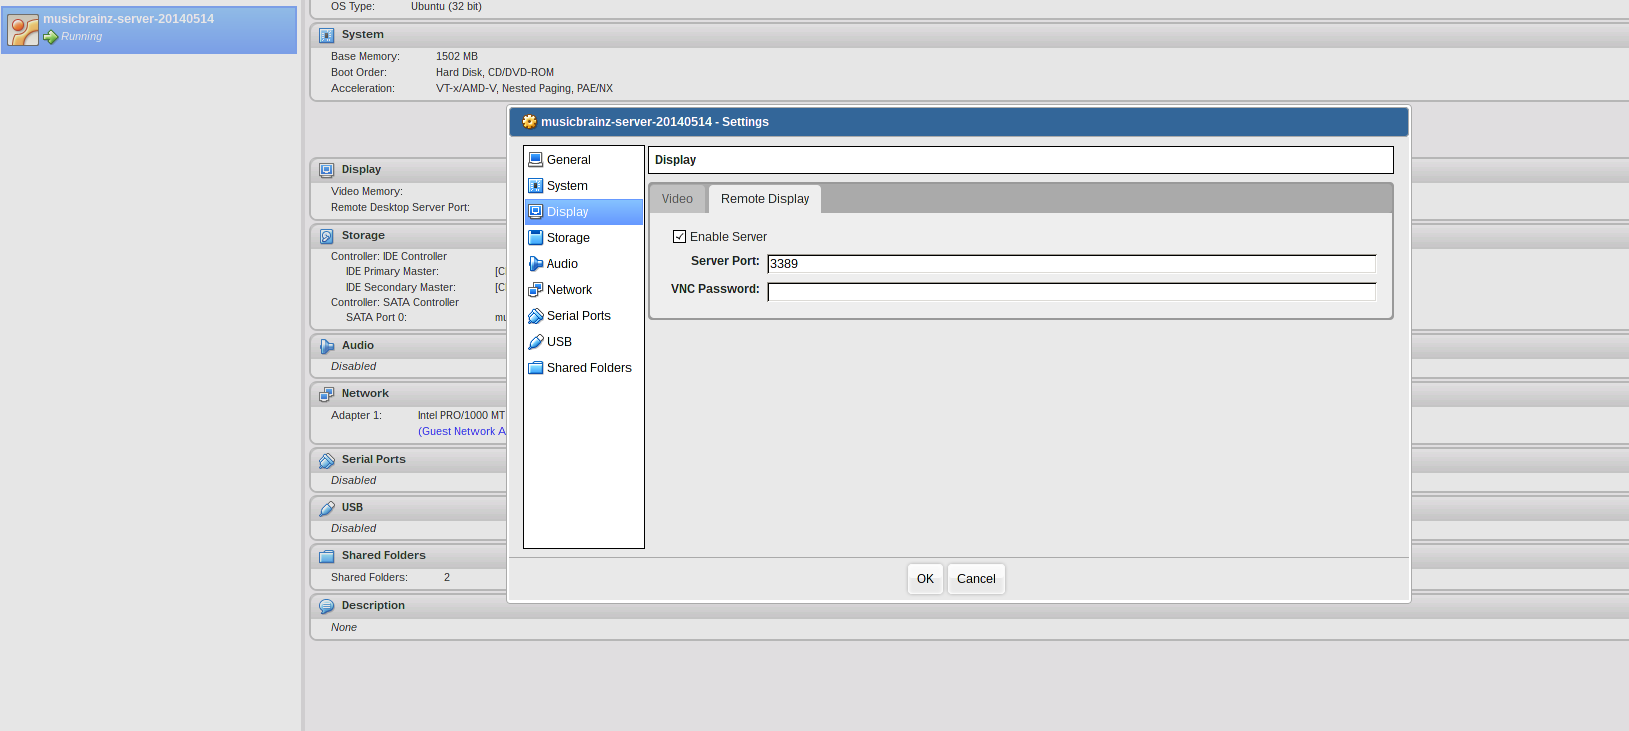
This lets you connect to the virtualbox via RDP VNC (thanks Joel!), so you can skip the grub-boot-menu. Save the settings and in the main site click on the console-button in the upper right corner. This should open a Java applet where you will see a grub-menu. Just press enter, then you can close the webapp, because we’re going to use SSH for the next steps.
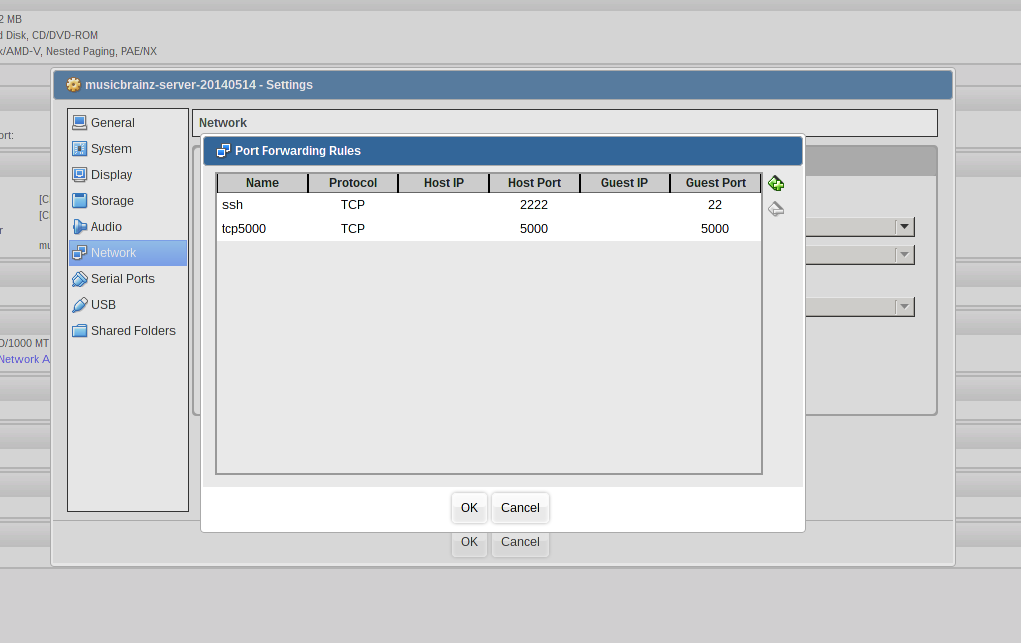
To enable SSH port-forwarding, click Settings, Network, then Port Forwarding. There, delete the Host IP in the ssh-row:
Configuration
Now you can connect to the VM:
ssh 192.168.0.13 -p 2222 -lvm #replace the IP-address with the address of the virtualbox-address.
jail is vm, password is musicbrainz.
After connecting, execute the followings commands. This will install curl, download the latest Musicbrainz-data and create the database with it.
sudo apt-get update && sudo apt-get upgrade
sudo apt-get install curl wget
mkdir /tmp/dumps
cd /tmp/dumps
VERSION=$(curl http://mirrors.dotsrc.org/MusicBrainz/data/fullexport/LATEST)
wget ftp://mirrors.dotsrc.org/MusicBrainz/data/fullexport/$VERSION/*
pushd /tmp/dumps/ && md5sum -c MD5SUMS && popd
cd /home/musicbrainz/musicbrainz-server/
dropdb -U musicbrainz musicbrainz
./admin/InitDb.pl --createdb --import /tmp/dumps/mbdump*.tar.bz2 --echo
If the import fails with a message like this:
Schema sequence mismatch - codebase is 20, /tmp/dumps/mbdump-cdstubs.tar.bz2 is 21 Failed to import dataset
Then you have to open the file /home/musicbrainz/musicbrainz-server/lib/DBDefs.pm and edit line 28. There change the number in the curly braces after DB_SCHEMA_SEQUENCE to 21 (or the number in the error message, if it’s different). Then try again creating the database.
If the database is successfully created, you have to create a searchable index for the data. There’s a simple command to do this:
cd ~
bin/reindex
When this completes (it will take a long time…again), you will want to start the replication. The replication is in charge for getting the latest data from the Musicbrainz-server. Don’t worry, the replication will only download the changed files, not the whole data again. To start the replication, do the following:
cd ~
bin/replicate start
If there weren’t any errors, you’re done with Musicbrainz!
Headphones

Installation
Install the headphones-plugin via the Freenas-frontend and start it afterwards.
After the installation is complete, you’ll have to add the downloads- and music-storage to the Headphones-jail. The correct paths for the source and destinations are described in the storage-paths-section. Again, if you don’t know how to do this, refer to the documentation in my other post.
There’s a bug in Freenas 9.2.1. It prevents directories from being created when creating a jail and ticking the “Create directory”-box. This bug results in the following error-message:
Sep 15 01:09:29 freenas manage.py: [middleware.exceptions:38] [MiddlewareError: The path could not be mounted /mnt/media/downloads: Mount failed (64) -> mount: /mnt/media/jails/headphones_1/media/downloads: No such file or directory ]
If you encounter this bug, you have to create the directories manually, as described above or here.
Configuration
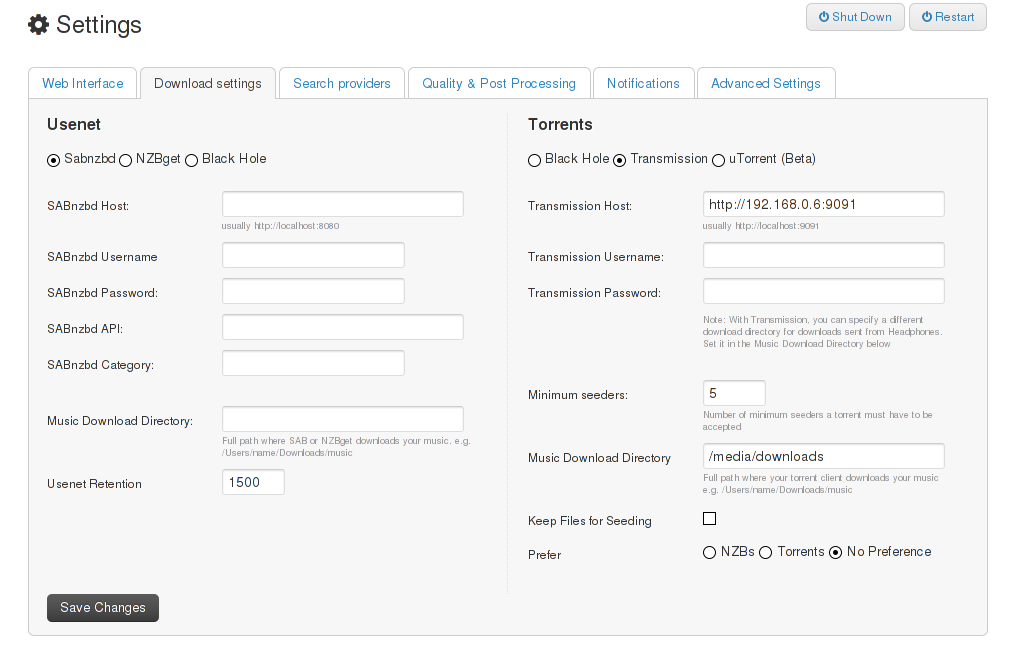
In the following part, you’ll be working with the Headphones-frontend, so open it in your browser. In the top right you’ll see a screw. Click it. You’ll find several differant tabs, open the one called Download settings. Here you can control, which Downloader you use. If you do not have an Usenet-account, you’ll have to use Transmission. Tick the box and as Transmission host, insert the correct IP-address. In the field Music Download Directory, you’ll have to enter the storage-path for the Music-destination. In my case, its /media/music.
Next tab. Open Search providers and on the right side, check the boxes for The Pirate Bay and Kick Ass Torrents, two free torrent-provider. If you have accounts for the other providers on the list, tick the boxes and enter your login credentials.
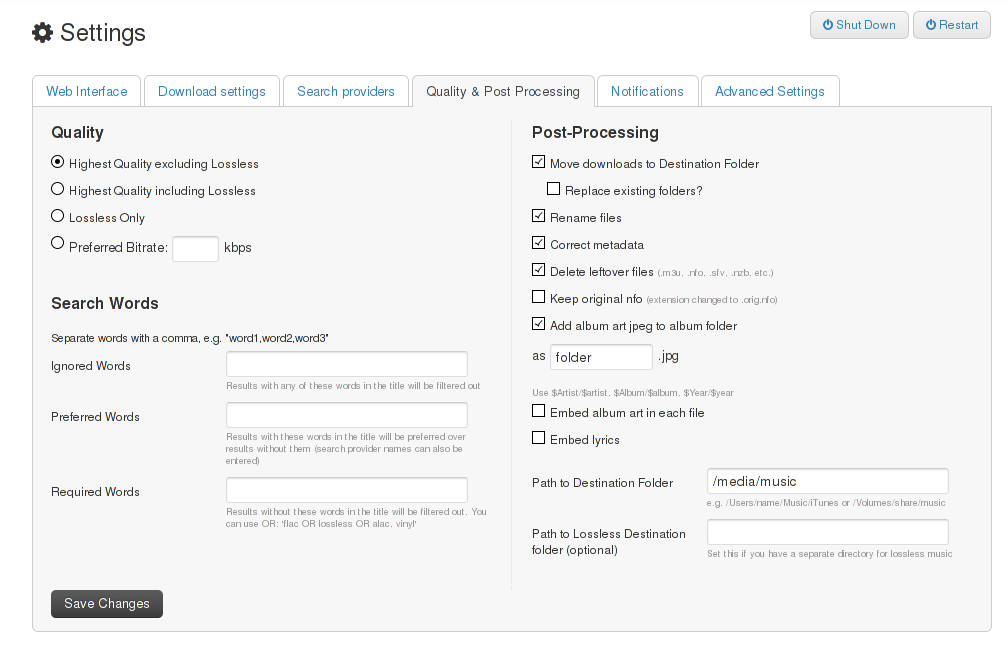
After that, open the Quality & Post-Processing-tab. You’ll have to tick several more checkboxes there. Essential is Move downloads to destination folder, you have to check this one. The following are optional, but recommended: - Rename files - Correct metadata - Delete leftover files - Add album art jpeg to album folder
You also have to fill ou the Path to destination folder! Enter /media/music. In the end it should look like this:
The last settings you have to edit are in the Advanced settings-tab. You’ll have to set the Folder permissions and File permissions in Miscellanous to 0777, that means everyone has read/write access to your files. Since my freenas-box is only accessable in my home-network, that’s not a problem, but if any untrusted users can access your music, you shouldn’t use 0777.
If you set up an own Musicbrainz-server before, now’s the time to use it. Insert the IP-address of your Virtualbox. Port stays 5000. Port-forwarding from Virtualbox to the VM is already activated, so there’s nothing more to do for you here.
Now it’s time to import your existing music-library! Click manage in the upper menu. There you can scan the directory that contains your music. I put all my music an my Freenas under /media/music. If you do the same (you should!), insert it into Path to directory, then press Save Changes and Scan. Now the frontpage of Headphones will start to fill up with your music-collection as its analysed then!
Appendix
Storage-paths
-
Transmission: You need the download-directory where it downloads the data to.
- Download-Source: /mnt/media/downloads - Download-Destination: /media/downloads -
Musicbrainz: You need the download-directory to import the ova-appliance you downloaded from the Musicbrainz-website.
- Download-Source: /mnt/media/downloads - Download-Destination: /media/downloads -
Headphones: You need the download-directory, where Headphones looks for downloaded music and the music-directory where it stores the downloaded music.
- Download-Source: /mnt/media/downloads
- Download-Destination: /media/downloads

- Music-Source: /mnt/media/music
- Music-Destination: /media/music